
Initial Setup
After first installation ESPGeiger requires configuring for connection to a WiFi network.
The ESPGeiger opens a local WiFi hotspot which allows the user to configure which WiFi network the ESPGeiger connects to.
Connecting to this WiFi hotspot should automatically show a configuration page.
Visiting http://192.168.4.1/ whilst connected to the hotspot will also show the configuration page.
Captive portal not appearing? The automatic popup relies on DHCP-assigned DNS. If your device has a manual DNS server set (e.g. a pinned
1.1.1.1or a local LAN DNS), the captive-portal detection probe fails silently because the DNS server isn’t reachable from the ESPGeiger AP. Either switch that interface to DHCP-assigned DNS, or just browse to http://192.168.4.1/ directly - both work.
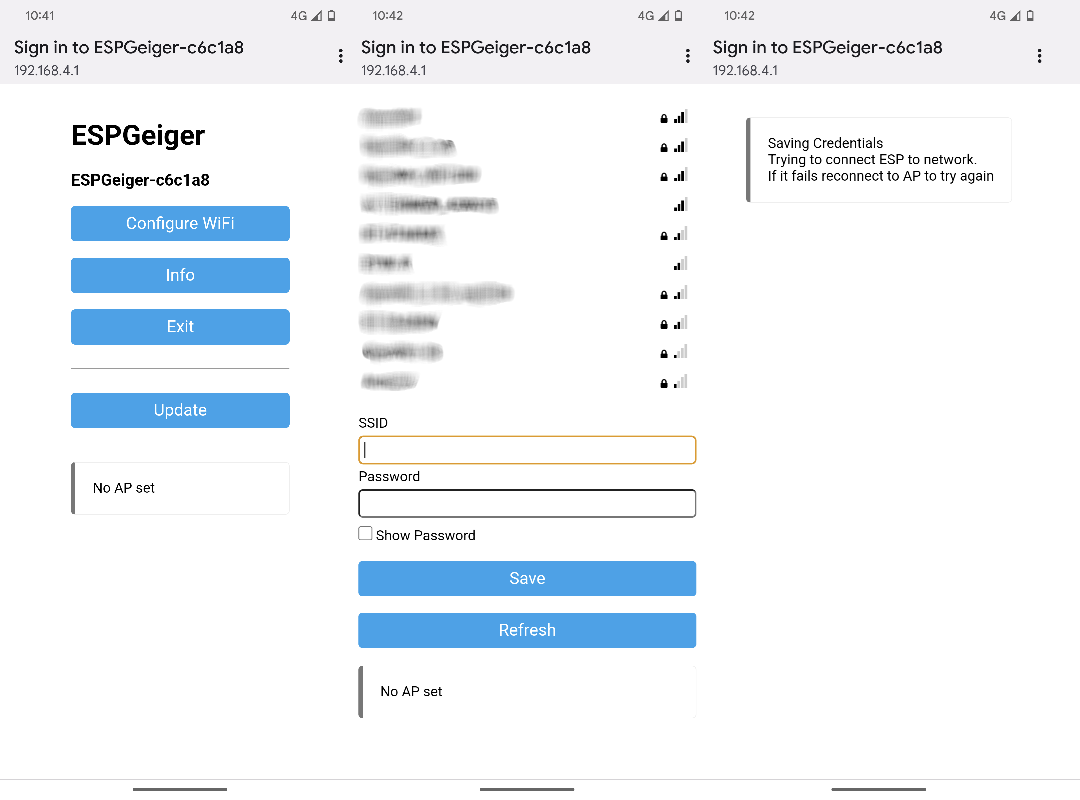
To configure ESPGeiger for WiFi:
- Once connected, make a note of your ESPGeiger’s ID - ESPGeiger-XXXXXX this will be used to connect to the web interface.
- Click Config Wifi
- Select your Wifi Access Point from the list shown, OR
- Enter your SSID in the form area provided
- Enter your password in the form area provided
- Click Save
After a few seconds your ESPGeiger should be connected to your WiFi.
You should now be able to browse to the ESPGeiger web interface to finish setup.
The ESPGeiger will be available on http://ESPGeiger-XXXXXX.local - an alternate is to find the DHCP address given to the ESPGeiger in your routers web interface.
Locked out of the web UI?
If you set a web password (Config → System → Web password) and have forgotten it, the device’s main web pages will keep prompting you for credentials. The password is stored on the device, not in the cloud, so there is no remote reset. There are three ways to recover, in order of least to most disruptive:
1. Clear via the USB serial console
Connect the device over USB to your computer and open a serial terminal at 115200 baud. Type:
set sys.web_pass
(That is, the set command with an empty value.) The change applies immediately, no reboot needed. The web UI will stop prompting on the next request.
To set a new password later: set sys.web_pass MyNewPassword.
2. Hardware button factory reset
On builds with a user button (ESPGeiger-HW, ESPGeigerLog, and ESP boards wired to GEIGER_BUTTON):
- Power off the device.
- Hold the user button.
- Power on while still holding.
- Keep holding for at least 15 seconds, then release.
The device performs a full factory reset, wiping all prefs (including the web password and the WiFi credentials). You will need to re-run Initial Setup from the top of this page.
3. Reflash via the Web Installer
Nuclear option: reflash the firmware from install.espgeiger.com. This wipes everything (web password, WiFi credentials, all output configurations). Re-run Initial Setup afterwards.
Network and security
ESPGeiger is designed to run on your local network, not on the open internet.
The web interface uses HTTP Basic Auth (no TLS), the /update endpoint allows over-the-air firmware replacement to any authenticated caller, and the device intentionally has no rate-limiting or hardening against brute-force attack. None of that is a problem on a trusted LAN. It is a problem on a port-forwarded WAN address.
If you need to reach your device from outside your LAN, use one of:
- VPN into your home network (WireGuard, Tailscale, ZeroTier, OpenVPN on your router).
- SSH tunnel from a trusted jump host.
- Reverse proxy (Nginx, Caddy) that terminates TLS and adds rate limiting in front of the device.
Do not port-forward the device’s HTTP port directly to the internet.
Remote monitoring done right
If you want your readings visible without your control panel being exposed, push the data out rather than letting clients reach in. ESPGeiger supports this out of the box:
- MQTT to a broker on the LAN, in your VPN, or on a trusted cloud provider - Home Assistant / Grafana / your dashboard subscribes there.
- Radmon.org, GMCMAP, ThingSpeak, GeigerLog - citizen-science archives that ingest your data; nothing inbound to the device.
- Custom Webhook to your own endpoint (HTTPS terminated by your server, not the device).
- WebAPI (api.espgeiger.com) - signed posts, nothing inbound.
This pattern (device pushes, clients subscribe) is also more bandwidth- and power-friendly than polling.